Google Form + Google Calendar = Zapier!

UPDATE: I’VE INCLUDED THE LINK TO THE CALENDAR, THE GOOGLE FORM AND THE ZAP AT THE BOTTOM OF THE POST
Here is the problem. Our teachers want to have a shared assessment calendar. That way they can see what tests are scheduled for each class and know how to not overload a kid. What student wants to have four tests on a single day? Well how to do this?
So we are a G-Suite school and we have the ability to create a Resource calendar. This is just a calendar that no one owns and everyone has the ability to create events. The trick here is that when teachers make an event in Google Calendar they will need to select the calendar when they make an event.

Again, this seems easy enough, but it’s also pretty easy to forget to do that. It’s very easy just to type in the test details and hit Save and not realize it’s not on the correct calendar. You can see where this goes.
Enter Google Forms and Zapier. Here the teacher does not need to worry about that information. The form will capture all the pertinent information and then using Zapier – it will create the event and schedule it on the correct calendar. Oh yeah – it is free too.
This isn’t hard but there are a lot of steps. Don’t worry though – I’ll link the calendar and the form out and the workflow from Zapier at the bottom of this post.
What is Zapier?
Most people know what Google Calendar is (if not it is pretty obvious) and Google Forms, but not everyone knows about Zapier. This is a service that allows you to take two different services and make them work together by creating triggers (or Zaps as they call them). So basically when someone fills out the form, Zapier will take that information and put it into a Google Calendar event and then schudule it automatically. Pretty great huh?
Step 1 – Create the calendar
This would be best if you go to your Tech department and have them create a Resource Calendar. This makes it easy for anyone to view and control. If your Tech department is not open to such requests, go ahead and make a calendar of your own.
Open Google Calendar (calendar.google.com) and sign in if need be. On the left hand side you will see Other calendars click the + symbol.

Now some new options will appear. Select Create new calendar.

Now you can name your Calendar and set the appropriate time zone (kind of important that last part).

Now we need to set the sharing settings up. So let’s go back to your calendar list by clicking the left arrow near the Settings

From the list find your new calendar. Move your mouse over the calendar name until you see three dots. Click those dots.

Now click on Settings and sharing

Make sure that Make available for [your school name] is checked and then save those settings.

Step 2 – Setting up the Google Form
This is pretty easy. Create a new Google Form either through Google Drive or thby going to forms.new and you can make your form look like mine below.

Now that your form is created, we need to create a spreadsheet for the responses. This is very easy. Click on Responses at the top of your form and then it will take you to another spot. From here click on the green Google Sheets icon.

It will ask you to name the spreadsheet and that is all you have to do with that!

Google Forms is pretty intuitive, but if you have any issues just let me know and I’ll give you hand.
Step 3 – Set up the Zap: Part 1 – The Google Form
With Zapier, you can sign in with Google and while there are paid versions of the service there is a limited free version that will be more than enough for my needs. So head over and sign up/sign in to Zapier!
Once you hav access to your dashboard, from the left hand side you will see an option to MAKE A ZAP

Now Zapier will start walking you through the process one step at a time. It is pretty fantastic what it can do. So obviously, when someone submits a Google Form so just type in Form to find the Google Form choice. Then select it.

Now it gives you two options. It can be whenever there is a new response from the Google Form or when there is a new response or if it has been updated. I like to go with the later. So it should look like this now.

This part may seem a little weird, but they want you to grant Zapier access to your Google Drive (which is where the form and the spreadsheet live). Go ahead and give it permission and then click Continue.

Now you need to tell Zapier which spreadsheet to look for and which worksheet of that spreadsheet to look at. Since this is from a Google Form, pick that spreadsheet where the responses will be stored and there should only be one worksheet, so it should look similar to mine.

Now it will ask you to test the trigger. If you have no responses recorded this will fail. If you want to see a result. Go to the Google Form and fill it out then run the trigger.
When it finds a response it will show you something that looks a little weird like below.

Step 3 – Set up the Zap: Part 2 – Google Calendar
Now that the Google Form is all set up, let’s move onto the Google Form part. So this is the Do this… part of the Zap. It will want you to pick what app you will use when it sees the Google Form has been completed. From here select Google Calendar.

It will ask you what you want to do. Select Create Detailed Event. This will allow you to provide much more info on the calendar event. Then click the big blue

Then it will ask you to confirm your account. I guess you could post this on another account if you wanted to. Now we get some options and boy-oh-boy are there options. Don’t worry we will just be dealing with the basics.
The good news is that it will pull data directly from the Google Form to populate the particular field. You just need to click the drop down menu and select it. Check out what I did below to see an example.
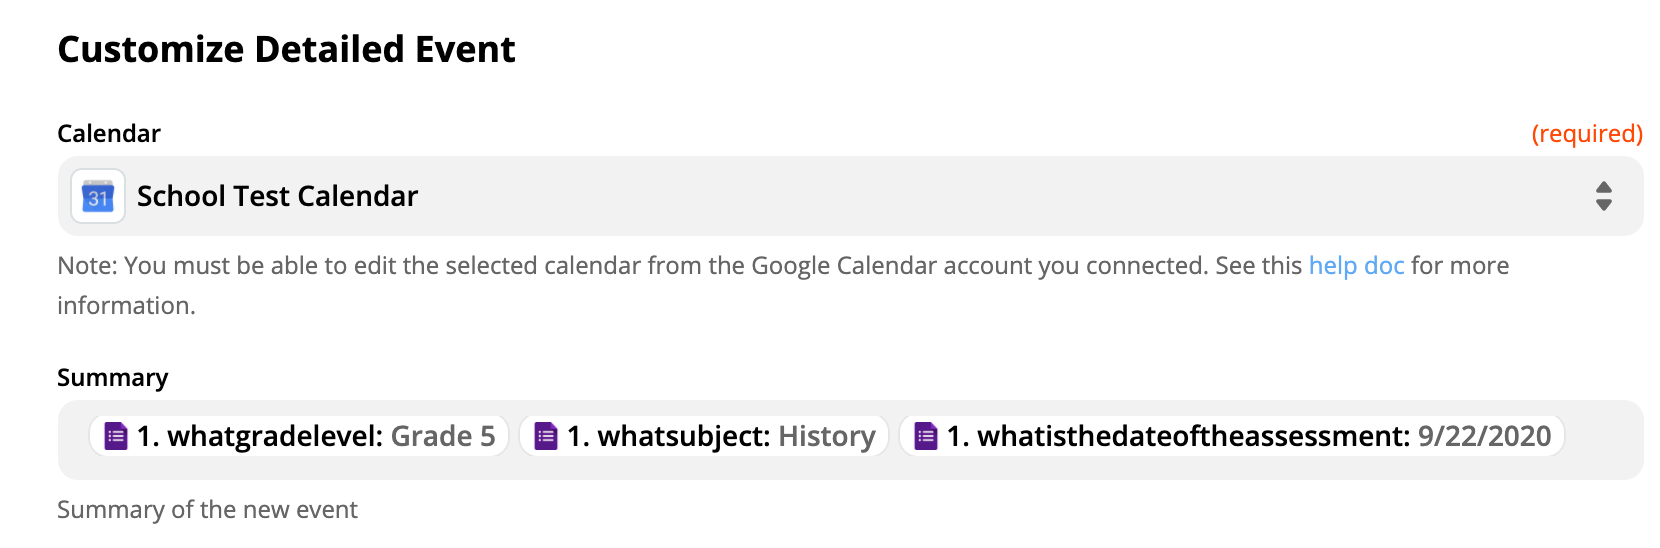
I basically put the grade level, subject and what the test was about all in one line. Be sure to put a space between those values so it looks nice.
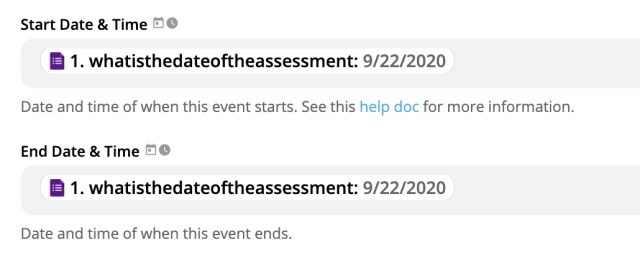
Then scroll down to find the Start Date & Time and the End Date & Time. This will be the same field from the Google Form.
Now scroll down a little further and for All Day be sure to select Yes. This will put all the assessments at the top of the calendar and in my opinion will make it look a little cleaner and easier to see.
Now scroll all the way to the bottom and select Continue.
Guess what – it’s finally made and ready to test. Once it tests, it will ask you to turn on the Zap – go ahead and click that button!
Step 4 – Test it for real!
So I go to my Google Form and fill it out
Now all I have to do is sit back and wait.
With the free plan it can take up to 15 minutes for Zap to take action and for the calendar event to be created. For the paid account it is much faster, but you still need to wait a few minutes for it to actually work, but work it will!
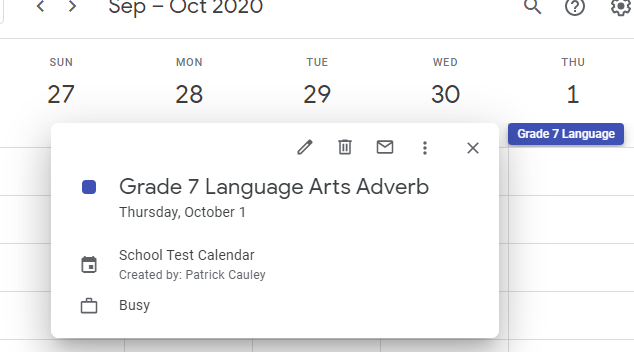
So here is the calendar for October 1
Only as good as…
This is a nifty tool that can bring a lot of transparency to a school, but of course there is a weakness. That weakness is noncompliance. If teachers forget on a regular basis or just ignores it all together this tool is not very effective.
That is where leadership comes into play. There has to be a driving push and force behind using this to make sure that what teachers, students (maybe even parents) see is accurate so they can plan. It does not necessarily need to be principals it could be department heads or just some people who are looking to improve things.
I’m not going to lie. Teachers have a lot on their plates and remembering this small simple task is not always on the top of their to-do lists.
The Links
Here are all the links needed for you to test this out for yourself. Just fill out the form, wait for about 15 minutes and you should see the details appear on the Google Calendar.
I did notice that the Zap was saying there was an error, but it never failed putting the event on the calendar. I think it has to do with the event starting and ending on the same day. If it works, it works I guess 
Google Calendar: https://calendar.google.com/calendar/embed?src=c_f56lrph45nl9lgp9vmabs0kac4%40group.calendar.google.com&ctz=America%2FNew_York
Google Form: https://docs.google.com/forms/d/e/1FAIpQLScB2gyWv61il1qK546Zno_ixGieXhOFV0TdYBKKPGhboofySg/viewform
Zap: https://zapier.com/shared/49316bed1b334217ad5de23f6cab26c0876bdb52
Source: IT Babble Blog and Podcast
You must be logged in to post a comment.