A/V in our classrooms

This post will give you a rundown of what we currently use for our A/V solution and what we are going to be switching to. I will be using specific names of products (and current prices if I can find them), but that is in no way IT Babble promoting those items. IT Babble receives no ad revenue or any financial compensation for mentioning them. This is just what my school is doing and what works for us. This set up may be complete overkill for some schools or completely not appropriate for others.
If you have questions, leave them in the comments. We moderate all comments so it will post when Tony or myself approve it and then I will respond.
Our gear in every class
Every class has pretty much the same stuff in it.
- Apple TV
- Document Camera
- DVD Player
- Receiver
- Laser Projector
- Book shelf speakers mounted to the wall
- Power in the ceiling for the projector
- We have already run a long HDMI cable from the projector to the front of the room
All the classrooms have the same generation Apple TV, the same IPEVO document camera and the same Casio Laser Projector. The DVD players are a real mix. Some are DVD/VCR combo players, some are newer and slim DVD players while others DVD players are a decade old. Some connect with HDMI while others connect using RCA cables (you know those pretty red, white and yellow cables)
All of our media devices, that I just mentioned, all connect to our receiver. If you’re not in the know, a receiver will accept many different inputs and then output them all to a display or in my case, a laser projector. The user can quickly switch between the Apple TV, document camera and DVD player with the tap of a button. We tend to use Onkyo receivers and they tend to run $225-280 a piece. 80% of the time this works fine, and at the time we needed to connect devices that had HDMI, VGA and RCA cables. We needed something that could handle most of those connections and a receiver is what the solution called for.
From there the video runs to the projector while the sound runs to some bookshelf speakers mounted to the wall. The speakers aren’t great, but for a classroom they easily fill that room and I think they sound more than adequate.
What’s the deal?
Even though this looks good on paper, there are some shortcomings. One, is the size.

These receivers are big and take up a lot of real estate in the classroom.
The second is cable management. There are a lot of cables going to this thing which is not just an eye sore in the classroom, it makes it very hard to replace said cables. I remember one time, it took us 90 minutes to figure out an RCA video cable (the yellow one) was bad in a room. Then it took us another 15 minutes to get it all unplugged and out of the room and then another 30 minutes running a new one. What a pain in the ass.
The third thing are the settings. Many of these receivers can play in mono, stereo, surround sound and more. When these settings get changed it can cause all sorts of issues. For example, if a teacher accidentally turns on the surround sound what usually
Of course these receivers are technology and no technology lasts forever. These receivers usually last between 3-5 years for us. When they broke down, the teachers pretty much lost all (or most) of their media tools. It would then take us about a week to get a new one and get it installed. That may not seem like a long time, but if you’re a teacher and you rely on these tools a week without them can seem like a very long time.
Welcome HDMI
Over the past 2-3 years we have been slowly killing off those VGA devices. We have been recycling those RCA cabled devices as well leaving only HDMI. With HDMI as the only connector in the room we now have more options. We now can unshackle ourselves from those receivers and take a look at other options.
The Apple TV has always been HDMI, the document camera is HDMI, DVD players are cheap(ish) and while there are some RCA DVD players out there a great majority of them are HDMI now. With the adoption of USB C, finding dongles that have VGA are getting more and more difficult to find. You may be able to find expensive powered docking stations with those connectors, but a dongle you can toss in your bag and go? Nope. You will only find HDMI there.
Option 1 – Crestron
This is what we initially wanted. You may not know who or what Crestron does, but you have probably seen their work. Ever walk into a room and someone turns on a projector/TV from a wall panel and then the sound comes out of integrated speakers in the ceiling and there are no visible wires to speak of? Yep – that is possibly a Crestron setup.
It is very sleek and reliable but very expensive. I won’t get into the nitty gritty of what we asked for or what was proposed but it would have been several thousands of dollars per room. While we may have been able to do this for our school it would have taken years to complete the project.
Also, we (the school) would have limited control over the Crestron hardware. We could probably manage it (reset rooms, etc.) but if there was a serious problem such as a component that was failing, we would have to go through the vendor for a replacement and then the vendor would most likely have to install and configure that component. All of that adds up to more costs.
Could we do this on our own? Yes, but there are problems we would need to overcome.
- Our projectors only have 2 HDMI inputs but our teachers want 4 (Apple TV, Document Camera, DVD Player, direct computer connection). How do we give them those inputs?
- Without a receiver – how to get the audio to the mounted speakers?
- How can teachers switch between those inputs?
DIY
We didn’t want to stick with the receivers. They are bulky, expensive and fail too often (for my taste). It’s too easy for settings to change and people who make those vendors are coming out with new receivers all the time and discontinuing older models. This isn’t too shocking but maintaining consistency within the classrooms is a losing battle.
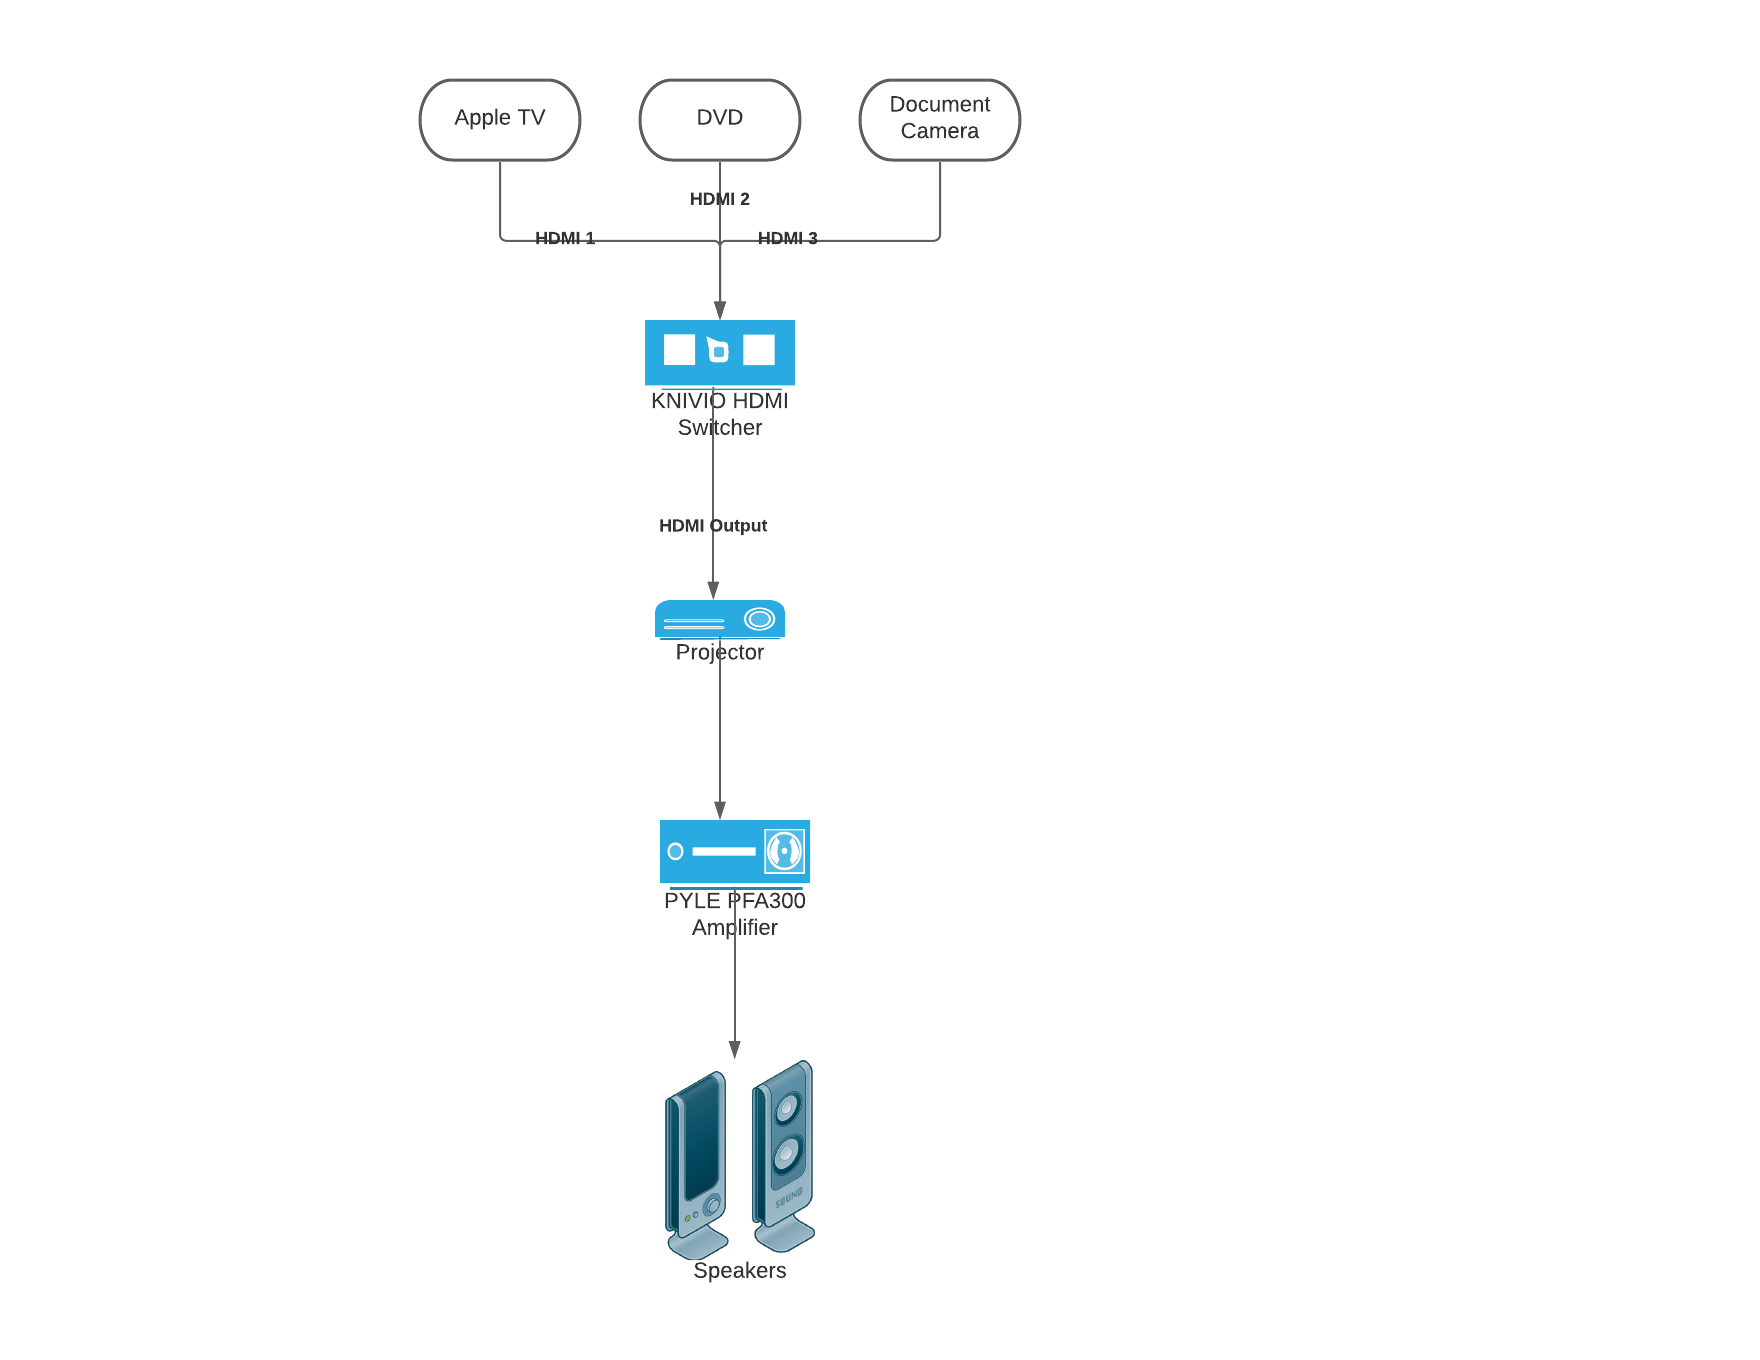
Enter the HDMI switcher. I am sure at one point these things were pricey but that time has long since gone. You can find hundreds of these on Amazon. They can come with 2 ports all the way up to 8 and we need 4 input ports. We are trying the Kinivio 5 port HDMI switcher.

With this device we can plug in the Apple TV, the document camera and the DVD player with two ports left for whatever else we need to plug into it.
Then we have a single HDMI cable that goes from the switch to the projector. The Casio projector has a headphone jack out for sound which is what we will utilize with this little amplifier: the Pyle PAF300.

This device will live in our classroom ceiling. We will use a headphone cable to connect the projector to this amplifier. Then run speaker cable from the amplifier to our mounted speakers at the front of the classroom.

You may notice that this amplifier requires power. Since we already have power in the ceiling for each classroom since there are projectors in most rooms, this is not an issue for us.
Flowchart
There are people out there who are visual learners so here is a flowchart to help you visualize what it would look like.
Total cost
Here is the good news (at least for us). We are able to pull off this setup for about $200 per classroom. We already have the Apple TV, the document cameras, the projectors and the speakers. So we only need to purchase the HDMI switcher, the amplifier the stereo speaker wire and some DVD players (some classrooms already have the HDMI variant). Here is the breakdown below. I rounded up to the nearest $5
- KNIVIO HDMI Switcher = $60
- Pyle PFA300 Amplifier = $30
- 100 feet of Amazon Basics Stereo wire = $15
- HDMI DVD player = $65
- HDMI Cables (1 foot each) = $15
GRAND TOTAL = $185 per classroom
Now if you were to go back and factor in the projector, Apple TV, document camera, 25-50 foot HDMI cable the cost would be closer to $1500 per classroom but even that is still cheaper than our Crestron solution.
Also, with a cheaper solution we can have extra switches and amplifiers on hand in case one goes down. Instead of waiting days or even a week we could switch out that component and have that teacher up and running again in minutes. That keeps the interruption to teaching and learning down to a minimum which is what we strive for 
Conclusion
I think that about covers it. This post has been fun and I’d love to hear what you are doing at your school concerning this. Leave those ideas in the comment section below. As I mentioned earlier, we have to approve all comments (to avoid all the spam that could get through) so be patient if it doesn’t show up immediately, but once it is there we will be sure to reply.
Source: IT Babble Blog and Podcast
You must be logged in to post a comment.