Bitpaper.io – A review

The other day a student walked into the Tech office and politely asked if we could whitelist a site for him: bitpaper.io. He uses this site with a stylus and a touchscreen computer at home to do his homework. For a worksheet, he will upload it into bitpaper.io and then use the stylus to write his answers. Basically it is a digital way to do his homework. I thought it was pretty interesting so here is a review.
Signing up
You have to sign up or sign into this service, but it is a little different. First, you have to create your first paper. Just click the Create Paper button right on the home screen.

It will force you to give your paper a name and thenit asks you to create an account or sign in using Google, Facebook or with an email account. I signed in with Google for convenience. The first time you sign in you have to pick a plan. They range from free to $100/month if you want to Create Calls (more on that later).
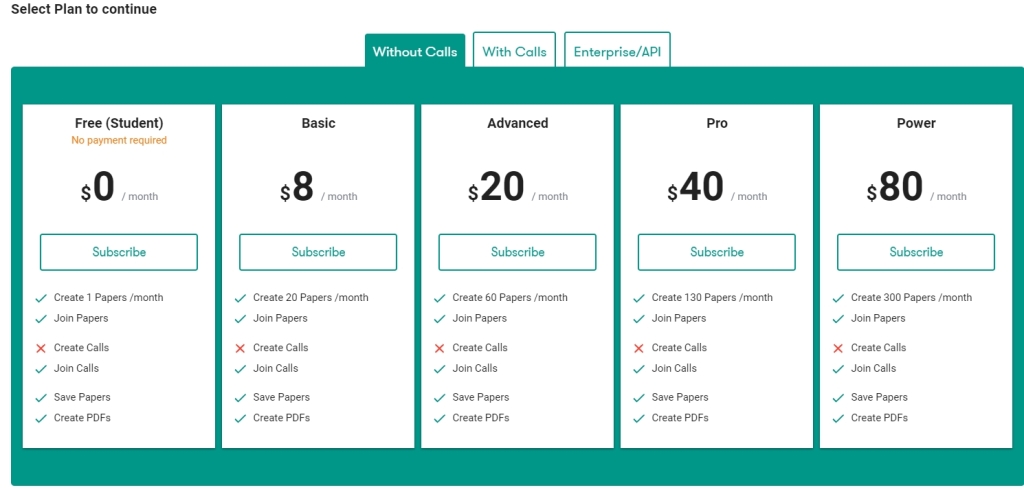
I picked the Free (Student) plan. On the free plan you can only have “1 paper” as it will let you know. Don’t worry though you can do a lot with this.

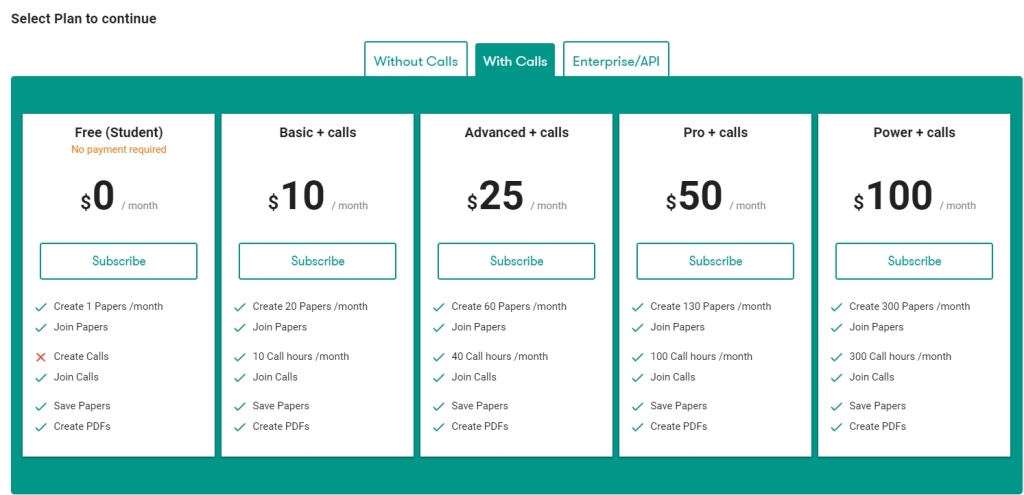
Before we get into how it actually works let’s chat about the ability to “Create Calls” that you can get with a paid account. This give you the ability to video or audio chat in the workspace with the other collaborators.
For the Without Calls plans they all look the same, but they are not. Depending on which plan you pick, this will determine how many new Papers you can create that month. For example if you go with the Basic plan for $8/month you can create 20 papers that month, then the next month rolls around you can create an additional 20 papers!
If you have unused papers or call time, that will roll over to the next month in addition to what you paid for. Pretty impressive and you can check the FAQ to make sure I didn’t misread anything.
Using it
Now that you’re on a plan and have created your first “paper” it is time to start using it. The interface is a blank page, ready for you to type, draw or build whatever you are looking at. Let’s start with the toolbar which is found at the bottom center of your workspace.

The toolbar options are pretty straightforward. You have:
- Color palette for changing the color of objects, lines or text
- Pen for drawing (with a highlighting and an angle option)
- Eraser
- Selector tool
- Arrow or object tool
- Text
- Equation editor
You can quickly switch between the tools using numbers on the keyboard which is nice. What gest a little odd is when you want to use one of the options. Instead of using the pencil, you can use the highlighter. Sometimes, it works perfectly. I just click on what I want and it works. Other times I click on the option (such as highlighter) and then try to click off and either it won’t deselect the highlighter or it will change to the pencil but it still shows the highlighter. It’s a little odd, but certainly you can get it to do what you want.
To get a sense of how it should work check out the quick GIF below.

The other tools are very straight forward. The eraser, erases but it is locked to a single size. It’s OK, but having the ability to make it larger or smaller would be nice.

The selector tool (looks like a cursor) lets you select, resize and rotate images. You can also select multiple objects to move, resize, etc. It is a nice tool and it works very well.

The compass looking tool just lets you quickly navigate around your bitpaper. The option (which looks like a camera) just recenters you on the document. The arrow key draws arrow but if you hit the refresh/recycle key you get lots of other choices to insert.

The text tool lets you type. You can adjust the size and add symbols if you’d like. I don’t see different fonts so you’re with what they offer.
A nice feature is that you can “Lock” an object, “Make unerasbale” or both.

You can also add images (not all formats are supported – sorry GIFs). There isn’t a tool or upload button, you just drag it into the workspace and it will process it.
One feature that it can do (and this is awesome) is that it can handle PDFs. Again, you just drag it onto your bitpaper and it will process it. If there are multiple pages, each page will be its own paper. This is the feature that got my attention when talking with a student at my school.
When you drag it onto the bitpaper you have two choices. You can Just Upload it and that will place it on the current bitpaper or you acan Upload and Expand and that will place it on its own page – this is the option you want. Then you can annotate on it and more.
Adding pages
It is true, that with a free account you can only create one bitpaper, but that doesn’t mean you cannot add pages to that single document and as far as I can tell there seems to be no limit. Just click the down arrow and it will add pages. If you have a PDF with multiple pages, it will automatically add each page as its own page which is nice.
This gives students and teachers a lot of room to work and not have to worry if you’re reaching the limits of the free version. I just wish there was a way to relabel them so it is not just numbers.

The left hand menu
Sometimes, you may delete an uploaded image or PDF and need to re-add it. Don’t worry bitpaper has you covered. On the far left hand side there is a a menu. The top icon looks like a clipboard and that is where you will find all your items that you have uploaded (images and PDF’s) to your bitpaper.
When you click it your uploads will slide out. From there you can drag it back onto your workspace if you want or you can delete it. If you delete it from this menu, the item does not delete from your workspace. You just will lose the ability to add it from this menu again.

The next icon is looks like a grid and it is all about adding a grid or changing the background of your document. adding a grid is nice, especially for some graphing work and changing the background color is a nice way to customize your space.

As you can see from the image above, you can add vertical and/or horizontal lines. Again, this could be good for a number reasons and you can change the grid as well. Background color is pretty straightforward. Just click on the swatch and you can pick a new color.
Below that is a phone icon where you can invite people to video chat but that is only available on a paid version.
What you can do on the free version is invite people to collaborate directly on your bitpaper. Just click the icon with the person and you will be given a link and the option to lock to bitpaper. If you lock it, the other person can view it but not make any changes.

If you want someone to edit it, just share the link with them. You will know they are in the document as you see their cursor zoom around in real time. If you have shared it with a number of people there is no way to tell who is who or who is making or has made a change. I am not a huge fan of this type of anonymity when it comes to school work.
Finally below that is the menu with the three lines. A click here opens up the menu for bitpaper. Here you can clear the whole page, head to the home screen, but most importantly, you can download the page as a PDF.

If you’re a student and drag in a worksheet to edit, then the export to PDF is what you’re looking for. After that is done you can upload it to any LMS your school uses or drop in in an email or even in your Google Drive or Microsoft One Drive and share it out that way. Either way this feature is pretty essential and glad that they have included it.
Conclusion
So as a teacher should you use it with your class? No – you shouldn’t but let me explain. As a classroom tool it is not what you want. The collaboration tool is just too anonymous and there is no way for you to push anything to their workspace. If you’re looking for something like that then try out whiteboard.fi. That is a great tool.
However, for individual students I think bitpaper.io is a good tool. It allows them to drag a worksheet into their own workspace and allow them to annotate or type on it. The student can then download it as a PDF and there are unlimited pages they can offer students a lot of options when it comes to doing their work.
Source: IT Babble Blog and Podcast
You must be logged in to post a comment.